
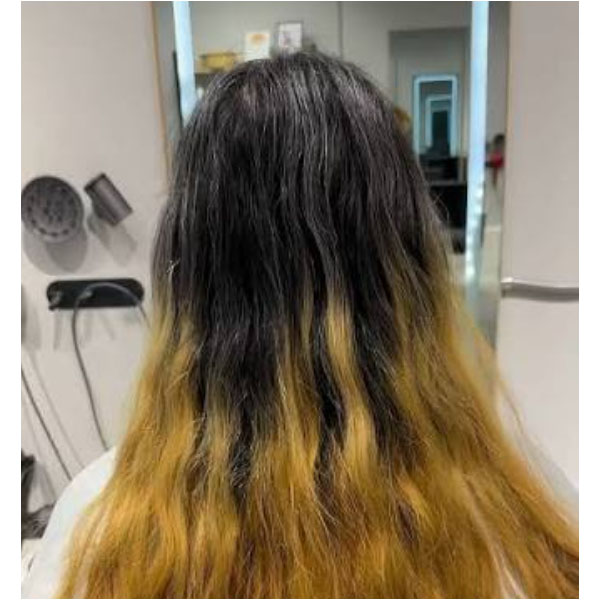
Here’s the trickiest situation you’ll see in any salon: a client who’s had a previous rebonding treatment. Now their roots have grown out—healthy, virgin hair—but the ends are still the old, damaged hair from before. Stylists call this “2-Section Hair” or “dual-texture hair.”
If you apply the straightening cream all over in one go, the results can be devastating. The healthy roots haven’t softened enough yet, but the damaged ends have already over-processed—turning gummy, weak, and snapping off like wet rice noodles. This is exactly why so many clients complain that their hair got worse after a rebonding touch-up.
So what’s the right way? I’ve been supplying salons for 22 years, and the step-by-step sectional softening method below is exactly how the pros handle this tricky situation.
What Is “2-Section Hair”?
Simply put, it’s when you have two completely different hair textures on the same head:
- Root Section (Section 1): New growth that came in after the last chemical treatment. Healthy, strong, and never touched by chemicals before.
- End Section (Section 2): The leftover hair from the previous rebonding. It’s been through one or more chemical processes. The cuticles are already damaged—drier, more porous, and far more absorbent to chemicals.
These two sections react to straightening cream at completely different speeds. The damaged ends can absorb the chemicals two to three times faster than the healthy roots. That’s why they must be treated separately.
💡 2-Section Hair Rebonding: The 6-Step Professional Workflow
1️⃣ Section First: Clearly Separate the Two Zones
Before touching any cream, visually identify the boundary line between the healthy roots and the damaged ends. This single step determines every timing decision that follows. If you can’t tell by looking, use your fingers—healthy hair feels coarse and springy; damaged hair feels softer, drier, and thinner.
2️⃣ Apply to Roots First: Let the Healthy Hair Soften First
Apply Step 1 Softening Cream to the healthy root section only. Start about 1.5 cm away from the scalp to avoid chemical burns. Let it process for about 22 minutes, performing a strand test every 5 minutes—gently stretch a single strand. It’s ready when it stretches to about 1.5 times its original length and slowly rebounds.
Why 22 minutes? Virgin hair has tightly closed cuticles. The cream needs more time to penetrate the cortex. This timing ensures thorough softening without crossing into over-processing.
3️⃣ Apply to Ends Second: Quick Application, Short Timing
Once the root section has reached the right softness, immediately apply the remaining cream to the damaged ends. Move fast, and be gentle. The ends need only 10 minutes of processing.
Why only 10 minutes? Damaged ends already have raised cuticles. The cream penetrates almost instantly. Too much time leads to over-softening—the hair turns into a gummy, rice-noodle texture that snaps at the slightest pull and can never be repaired.
4️⃣ Rinse Everything Together: Strictly Control Total Processing Time
This is the most critical point: from the moment the first drop of cream touches the hair to the moment it’s all rinsed out, total time must not exceed 30 minutes. Once both sections are done, rinse thoroughly with lukewarm water—no shampoo. Towel-dry, then blow-dry until completely dry.
5️⃣ Flat Iron: Work in Thin Sections, Then Wait for Complete Cooling
Use a professional flat iron set to about 180°C (356°F). Take thin, small sections and pass the iron from root to tip 4–5 times with steady, even pressure. After straightening, let the hair cool down completely—do not bend it, tuck it behind the ears, or clip it up during this cooling phase. The hair is still setting. Any bend at this stage will leave a permanent kink.
6️⃣ Step 2 Neutralizer: Lock in the Straight Shape
Apply Step 2 Neutralizing Cream evenly, making sure every strand is coated. Leave it on for 20 minutes to allow the broken disulfide bonds to rebuild in their new straight position. Then rinse thoroughly with lukewarm water—again, no shampoo. Blow-dry, and the result is sleek, shiny, damage-free straight hair.
Why Sectional Softening Matters So Much
Many stylists—and home DIYers—fail on 2-section hair for one simple reason: they didn’t separate the sections. The result is either over-processed, broken ends, or under-processed roots that won’t stay straight. Neither outcome is acceptable.
Proper sectional softening allows each section to process within its own safe time window, then rinses everything together. You get even, lasting straightness while minimizing damage to the most vulnerable part of the hair.
Not Sure About Your Hair Type?
Every head of hair is different—coarse or fine, previously bleached or not, how damaged the ends really are—all of these factors affect which product to choose and how long to process. If you’re unsure, just WhatsApp me directly.
📲 WhatsApp me personally: Click here to chat directly with Wong Chin Fong—22 years of salon supply experience, free advice, no pressure.
🔗 Want to learn the basics first? Read The Complete Guide to DIY Hair Rebonding: Salon Secrets for Straight, Healthy Hair.
📦 Salon Group Buy (Join Order): Secure Factory Prices, Save Your Cash Flow!
If you order in small batches for a single salon, you’ll definitely be paying premium prices. Why not combine our orders? You get the rock-bottom wholesale price instantly! Shine Hair Zone compiles orders for everyone—just tell us what you need, and we’ll hit the volume quota to fight for the lowest factory prices. Say goodbye to stuck cash flow! Hot items for our group buy include:
- 🛡️ Salon-Exclusive Brands (Not sold on Shopee/Lazada. Customers can’t compare prices online, so you protect 100% of your profit margin!)
- 🧴 Rebonding / Straightening Creams (Take by the carton for the best wholesale price).
- 🌙 JAKIM-Certified Halal Brands (Muslim customers can use them with zero doubts, instantly boosting your salon’s credibility!)
- 🏷️ Major Salon Brands (L’Oréal, Schwarzkopf, Shiseido, and other salon-sized professional lines).
* Note: Group buy prices are strictly nett. This excludes postage, packing, and a small runner/admin fee (we do transparent business here, strictly no hidden charges).
In today’s economy, protecting your cash flow is everything. Stop forcing yourself to hoard boxes of dead stock that just collect dust. Just list down what you need, and I’ll help you secure the best price for everyone!
📲 Click to WhatsApp & Join The Group Buy Now!